# Installation
# NADA requirements
NADA requires PHP, a MySQL database and a web server.
# PHP
The minimum required version is PHP 7.3 with the following PHP extensions enabled, see page PHP configurations:
- xsl
- xml
- mbstring
- mysqli
For Microsoft SQL Server, see page installation with SQL Server.
# Web server
- Apache 2.4 or later
- IIS 6/7.x or later
- NGINX
# Supported databases
- MySQL 5.x or MySQL 8
- Microsoft SQL Server with fulltext support
For MySQL, NADA supports version below 5.6 (no longer supported by MySQL community) but for better performance use the latest 5.7 or MySQL 8.
# Option 1: Download source code package
- NADA source code is hosted on Github: http://github.com/ihsn/nada (opens new window)
- Visit the release tab and download the latest zip package - https://github.com/ihsn/nada/releases (opens new window)
- Open and extract (unzip) the files to your local hard drive or web server where you want to install NADA.
# Copy files to your web server
Copy the files to a folder on the web server root folder. If installing on a localhost - for example the computer currently being working on – then copy and paste (or move) the files into the root folder (or a sub-folder) of the web server. If, however, the server is running on a remote host (such as an ISP), then this process will involve the use of a FTP client program or file manager from the ISP’s Cpanel.
NOTE
The folder name chosen will in many cases become the URL for the catalog. Examples for a folder name might be – data, microdata, catalog etc.
The root folder is located in different places depending upon the operating system/distribution and web server package you are using and it might be called htdocs, httpd, or www. On Windows servers this might be located in the inetpub directory and on Linux in the /var/www/html directory. Consult the documentation for the operating system being used or contact the ISP if unsure where the root web folder is.
# Option 2: Download source code using GIT
You can use GIT to download NADA source code from Github, you'll need a GIT client installed to be able to run GIT commands.
# Install GIT client
For running the GIT commands to get/clone the source code, you'll need to install GIT on your web server or your local machine. There are several options available:
- SourceTree - https://www.sourcetreeapp.com/ (opens new window)
- GIT SCM - https://git-scm.com/downloads (opens new window)
- Github Desktop - https://desktop.github.com/ (opens new window)
There are many other GIT tools available, you can use whichever you prefer. Almost all GIT tools, come with a command line (CLI) tool. We will be using the GIT CLI commands.
# Download source code
To get the source code, use the following command. This will create a copy of the source code into a local folder on your machine or web server.
#this will create a folder named nada
git clone https://github.com/ihsn/nada.git

#to create a different folder name
git clone https://github.com/ihsn/nada.git <folder-name>
# Set folders permissions
Change the permissions for the following folders and their contents to READ/WRITE.
datafiles – this is the folder where NADA stores data
NOTE
For added security, it is strongly recommended that the location of the datafiles directory be changed after installation to a location outside your web root structure.
logs – this is where the log files will be stored files - folder for storing sessions files, thumbnails and other temporary files
# For IIS on Windows
On Windows servers make sure the IIS AppPool\<applicationpoolname> user has read/write/delete permissions. If you are using the default App Pool, the user account is named IIS AppPool\DefaultAppPool.
# Linux
For linux, you can run the following command to set the permissions
$ chmod -R 755 datafiles files logs
Make sure you set the web server user account to be owner of the files and folders. For example, if you are running Apache with the user account www-data, run this command to change the ownership:
$ chmod www-data:www-data -R <nada-root-folder>
# Configure MySQL database
Browse to the
your-nada-web-folder/application/configfolder.Make a copy of the file
database-sample.phpand rename it todatabase.phpOpen the
database.phpfile in a text editor like Notepad or Notepad ++, and fill in the following informaiton:
hostname - ipaddress or the machine name where database is hosted
username - database user name
password - database password
database - database name
$db['default'] = array(
	'dsn'	=> '',
	'hostname' => 'localhost',
	'username' => 'nada_user',
	'password' => '<db-pass-here>',
	'database' => 'nada',
	'dbdriver' => 'mysqli',
	'dbprefix' => '',
	'pconnect' => FALSE,
	'db_debug' => FALSE,
	'cache_on' => FALSE,
	'cachedir' => '',
	'char_set' => 'utf8',
	'dbcollat' => 'utf8_general_ci',
	'swap_pre' => '',
	'encrypt' => FALSE,
	'compress' => FALSE,
	'stricton' => FALSE,
	'failover' => array(),
	'save_queries' => TRUE,
	'prefix_short_words'=>TRUE
);
- Save the file.
NOTE
Do NOT use the root username and password (MySQL) or SA Account (MSSQL) on your production server. Create a separate user name and password for your NADA database. This can be done either from your Cpanel or from PhpMyadmin, MySQL Workbench.
# Create database user account
You'll need to create an empty database for NADA to use. You'll need to use a database client such as MySQL Workbench, PhpMyAdmin or Command line:
From the command line type to connect using the root account:
$ mysql -u root –p
To create a new blank database, run:
mysql> CREATE DATABASE nada;
Now create a user who can access the new nada database and give the user only the rights necessary to run the NADA.
mysql> GRANT SELECT, INSERT, UPDATE, DELETE, CREATE, DROP, INDEX, ALTER, CREATE TEMPORARY TABLES,LOCK TABLES ON nada.* TO 'nada'@'localhost' IDENTIFIED BY 'yourpassword';
yourpassword - can be anything you choose. It is a good practice to use a password that contains text, numbers and special characters.
NOTE
Make sure to write it down, you will need it to configure your NADA!
Then exit MySQL console by typing exit.
mysql> exit
# Running the installer
Open web browser to the location of the NADA installation. For example: http://your-domain/nada-folder-name (opens new window), or http://localhost/nada-folder-name (opens new window).
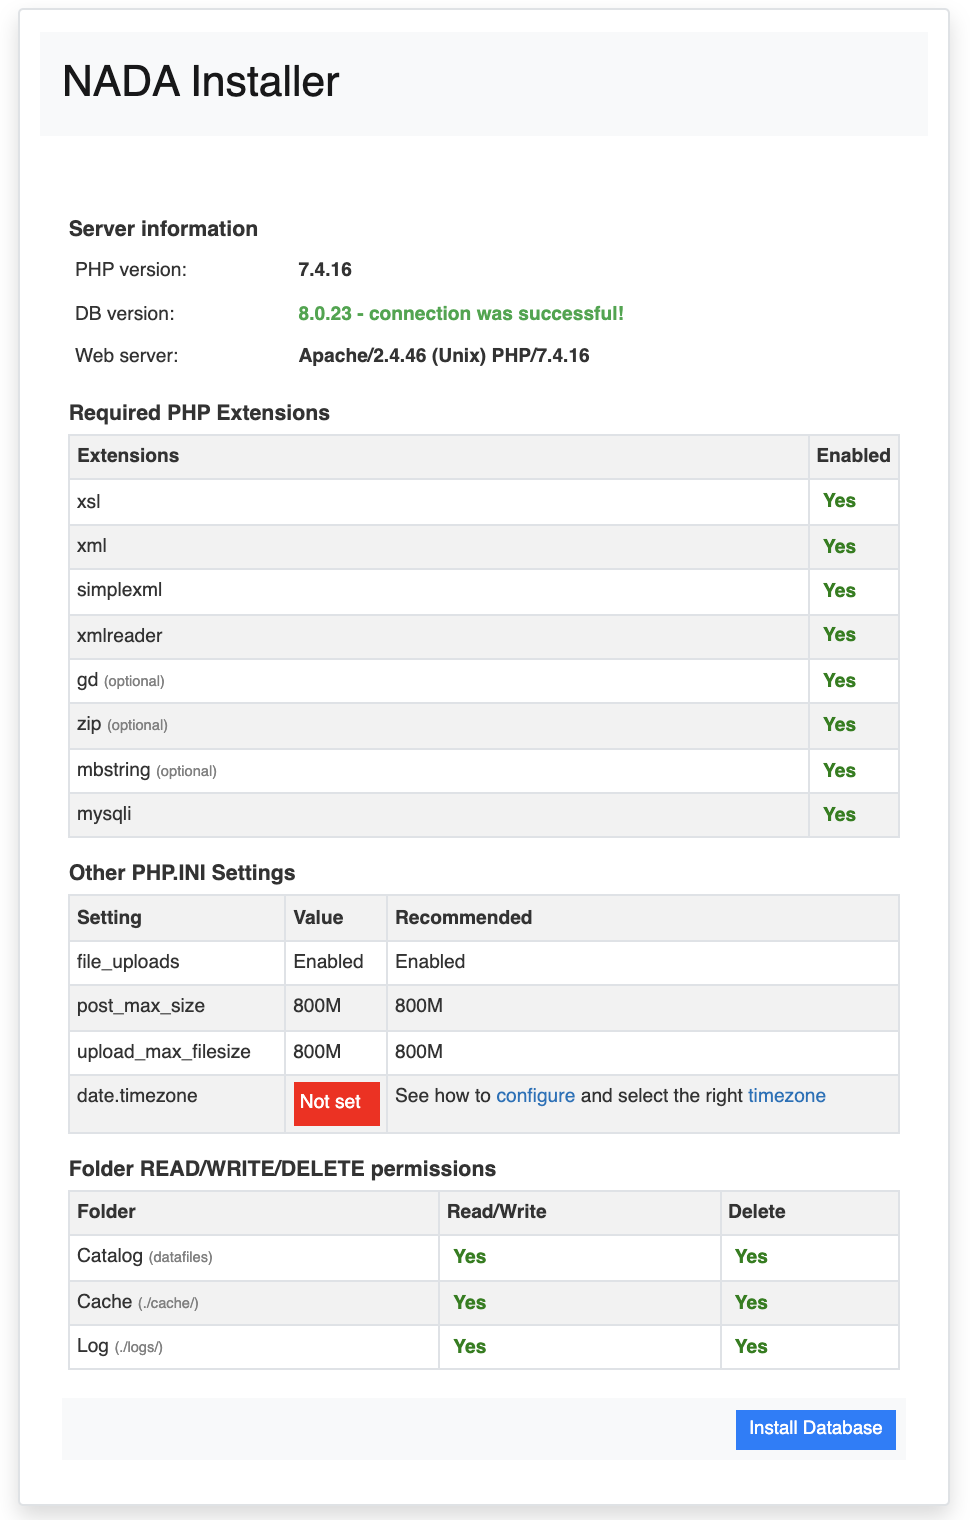
Check that all settings are marked with a green tick and fix any that are not on your webserver before running the installer. See page PHP configurations to update PHP extensions and configurations.
Click on the Install Database button and complete the form to create an initial Site Administrator account.
Complex Password
Create a complex password at least 12 characters long with some uppercase, punctuation and numbers to aid security of your site. Do not forget this username and password!