# Widgets
# Introduction
Widgets are embeddable interactive visualizations and content that can be attached to studies/datasets in your catalog. They allow you to create custom charts, graphs, and interactive content using HTML, CSS, and JavaScript, and embed them directly into study pages.
# Key Features
- Embeddable Visualizations: Create interactive charts and visualizations
- Study Integration: Attach widgets to specific studies/datasets
- Custom Content: Full control over HTML, CSS, and JavaScript
- API Management: Create, update, and manage widgets via REST API
# Creating Your First Widget
A widget consists of HTML, CSS, and JavaScript files packaged in a ZIP archive. The main entry point must be an index.html file.
# Widget Structure
my-widget/
├── index.html      (required - main entry point)
├── style.css       (optional - custom styles)
├── script.js       (optional - custom JavaScript)
└── assets/         (optional - images, fonts, etc.)
    └── thumbnail.png
# Requirements
- Entry File: Must have an
index.htmlfile (or at least one HTML file) - File Types: Only these file types are allowed:
- HTML files (
.html) - JavaScript files (
.js) - CSS files (
.css) - Images (
.png,.jpg,.gif) - Fonts (
.ttf) - JSON files (
.json)
- HTML files (
- ZIP Format: Files must be packaged in a ZIP archive
- Dependencies:
- Versions prior to 5.5.1: Widgets require jQuery and Bootstrap 4 or 5 to be included in your widget main HTML file
- Version 5.5.1 and later: JQuery and Bootstrap dependencies are removed from the widget environment.
- Height Requirements: Widgets must use fixed pixel heights (e.g.,
500px) instead of percentage heights (e.g.,100%).
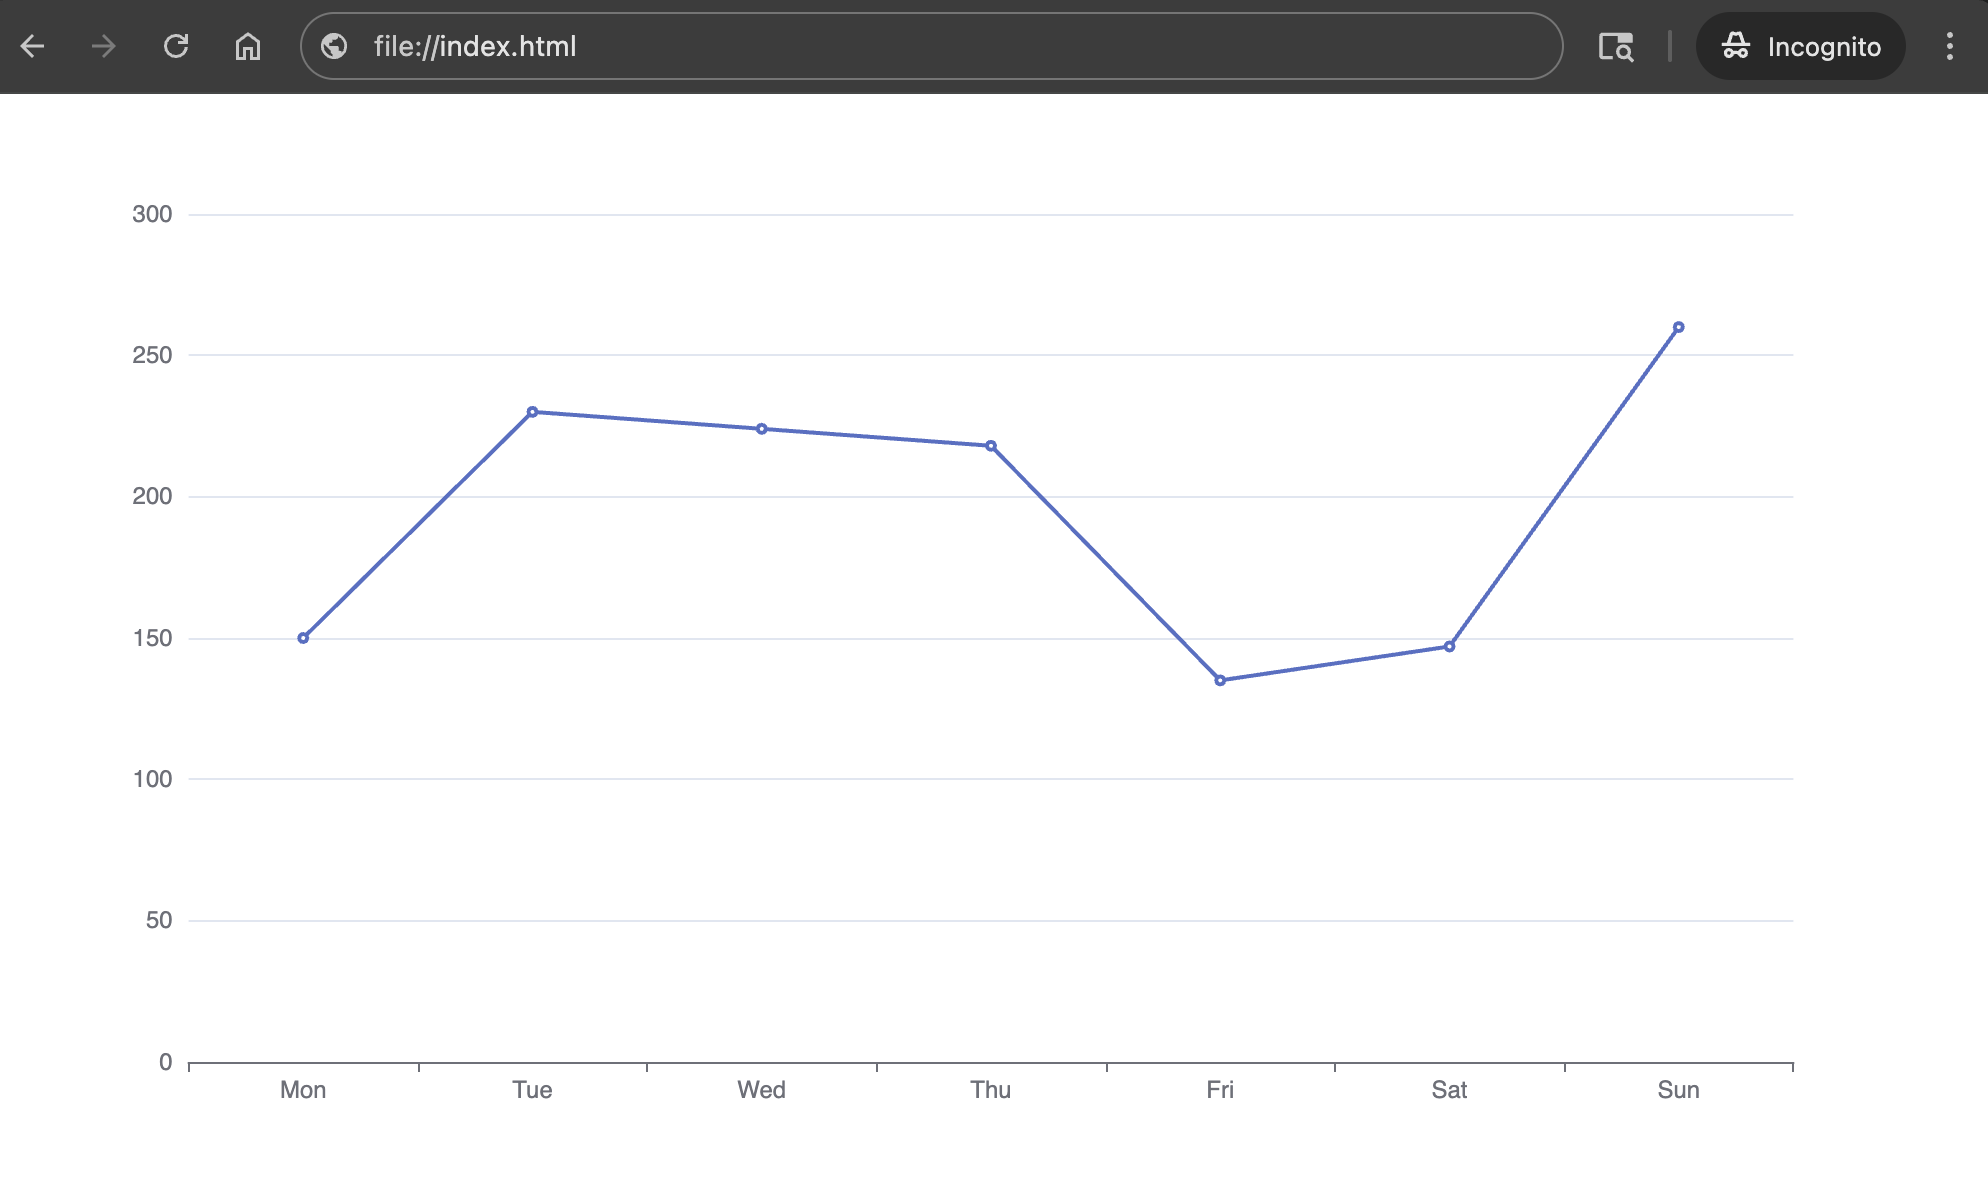
# Building a Line Chart with ECharts
This section demonstrates how to create a basic line chart using Apache ECharts.
# Step 1: Create the HTML Structure
Create an index.html file with the following content:
<!DOCTYPE html>
<html lang="en" style="height: 100%">

<head>
  <meta charset="utf-8">
</head>

<body style="height: 500px; margin: 0">
  <div id="container" style="height: 500px"></div>

  <!-- Need Bootstrap and JQuery for the widget for NADA 5.5 or earlier -->
  <link rel="stylesheet" href="https://maxcdn.bootstrapcdn.com/bootstrap/4.0.0/css/bootstrap.min.css"
    integrity="sha384-Gn5384xqQ1aoWXA+058RXPxPg6fy4IWvTNh0E263XmFcJlSAwiGgFAW/dAiS6JXm" crossorigin="anonymous">
  <script src="https://code.jquery.com/jquery-3.5.1.min.js"
    integrity="sha256-9/aliU8dGd2tb6OSsuzixeV4y/faTqgFtohetphbbj0=" crossorigin="anonymous"></script>

  <!-- ECharts for the widget -->
  <script type="text/javascript" src="https://fastly.jsdelivr.net/npm/echarts@5/dist/echarts.min.js"></script>

  <script type="text/javascript">
    var dom = document.getElementById('container');
    var myChart = echarts.init(dom, null, {
      renderer: 'canvas',
      useDirtyRect: false
    });
    var app = {};

    var option;

    option = {
      xAxis: {
        type: 'category',
        data: ['Mon', 'Tue', 'Wed', 'Thu', 'Fri', 'Sat', 'Sun']
      },
      yAxis: {
        type: 'value'
      },
      series: [
        {
          data: [150, 230, 224, 218, 135, 147, 260],
          type: 'line'
        }
      ]
    };

    if (option && typeof option === 'object') {
      myChart.setOption(option);
    }

    window.addEventListener('resize', myChart.resize);
  </script>
</body>

</html>
Important Notes:
- Height: Always use fixed pixel heights (e.g.,
500px) instead of percentage heights (e.g.,100%). Percentage heights will cause the widget to not render correctly. - Dependencies: If your widget uses jQuery or Bootstrap, include them via CDN or bundle them in your ZIP file. Starting with version 5.5.1, these dependencies are no longer automatically available in the widget environment.
# Step 2: Test
To test your chart renders correctly, you can open the file index.html in a web browser to preview.
# Preparing Widget Files for Upload
# Step 1: Organize Your Files
Create a folder structure for your widget:
my-line-chart/
├── index.html
├── style.css (optional)
└── script.js (optional)
# Step 2: Create the ZIP Archive
- Select all files in your widget folder
- Compress the files
- Rename the ZIP file (e.g.,
my-line-chart.zip)
# Step 3: Verify ZIP Contents
Before uploading, ensure:
- ✅ The ZIP contains an
index.htmlfile (or at least one HTML file) - ✅ Only allowed file types are included (html, js, css, png, jpg, gif, ttf, json)
- ✅ No executable files or scripts that could be security risks
- ✅ File paths are relative (no absolute paths)
# Using the Widgets API
All widget management operations are performed through the REST API. You'll need admin privileges to create, update, or delete widgets.
# Create Widget
curl -X POST "https://your-catalog-url.com/api/widgets/my-widget-001" \
  -H "X-API-KEY: your-api-key" \
  -F "title=My First Widget" \
  -F "description=An example widget" \
  -F "file=@my-widget.zip"
# Preview Widget
To view all widgets, visit https://your-catalog-url.com/index.php/widgets (opens new window) page. You should see the newly created Widget listed on the page. Click on the Widget to open the Widget preview page.
# Attach to study
To show the widget on one or more study pages, you will need to attach them to the study using the API.
curl -X POST "https://your-catalog-url.com/api/widgets/attach_to_study" \
  -H "X-API-KEY: your-api-key" \
  -H "Content-Type: application/json" \
  -d '{"uuid": "my-widget-001", "idno": "STUDY-001"}'
Now you can open the study and should be able to see the Widget rendered on the page.